Controlem un Led amb el telèfon
Servidor web simple
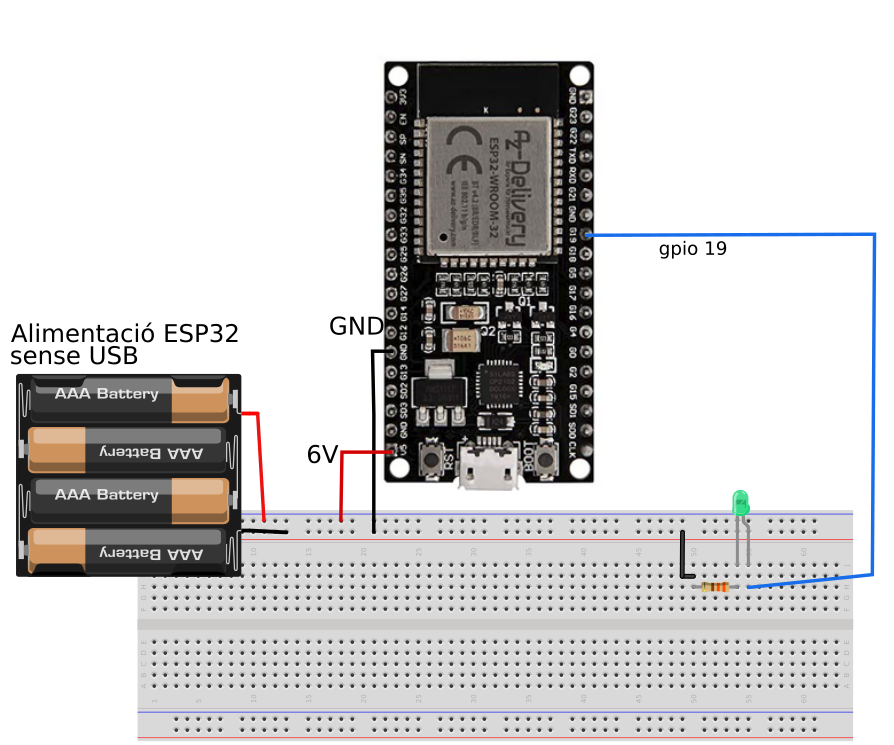
Anem a agafar el muntatge d'un led i el modifiquem lleugerament per fer que ESP32 dispose de més energia per emetre sense recorrer al cable USB de l'ordinador. El cable USB sols el posaré per passar el programa i després el trauré.

Hem canviat el cable i la font d'alimentació per posar 6V al pin de 5V que té un regulador de tensió que converteix el voltatge d'entrada a 3,3 V. No poseu voltatges molt elevats o acabareu fent petar la targeta ESP32.
Agafem el codi de SimpleWifiServer que tens als exemples d'Arduino i el modifiquem una mica per millorar la presentació web amb el codi per apagar i engegar leds de forma remota.
/*
 WiFi Web Server LED Blink

 A simple web server that lets you blink an LED via the web.
 This sketch will print the IP address of your WiFi Shield (once connected)
 to the Serial monitor. From there, you can open that address in a web browser
 to turn on and off the LED on pin 5.

 If the IP address of your shield is yourAddress:
 http://yourAddress/H turns the LED on
 http://yourAddress/L turns it off

 This example is written for a network using WPA encryption. For
 WEP or WPA, change the Wifi.begin() call accordingly.

 Circuit:
 * WiFi shield attached
 * LED attached to pin 5

 created for arduino 25 Nov 2012
 by Tom Igoe

ported for sparkfun esp32
31.01.2017 by Jan Hendrik Berlin

Modificat per Carles per millorar la presentacio HTML de la web

 */

#include <WiFi.h>

const char* ssid     = "La_teua_SSID";
const char* password = "La_teua_contrassenya";

WiFiServer server(80);

void setup()
{
    Serial.begin(115200);
    pinMode(19, OUTPUT);      // set the LED pin mode

    delay(10);

    // We start by connecting to a WiFi network

    Serial.println();
    Serial.println();
    Serial.print("Connecting to ");
    Serial.println(ssid);

    WiFi.begin(ssid, password);

    while (WiFi.status() != WL_CONNECTED) {
        delay(500);
        Serial.print(".");
    }

    Serial.println("");
    Serial.println("WiFi connected.");
    Serial.println("IP address: ");
    Serial.println(WiFi.localIP());

    server.begin();

}

int value = 0;

void loop(){
 WiFiClient client = server.available();   // listen for incoming clients

  if (client) {                             // if you get a client,
    Serial.println("New Client.");           // print a message out the serial port
    String currentLine = "";                // make a String to hold incoming data from the client
    while (client.connected()) {            // loop while the client's connected
      if (client.available()) {             // if there's bytes to read from the client,
        char c = client.read();             // read a byte, then
        Serial.write(c);                    // print it out the serial monitor
        if (c == '\n') {                    // if the byte is a newline character

          // if the current line is blank, you got two newline characters in a row.
          // that's the end of the client HTTP request, so send a response:
          if (currentLine.length() == 0) {
            // HTTP headers always start with a response code (e.g. HTTP/1.1 200 OK)
            // and a content-type so the client knows what's coming, then a blank line:
            client.println("HTTP/1.1 200 OK");
             client.println("Content-type:text/html");
             client.println();
             client.println("<BODY style='background-color:white'>");
             client.println("<font style='color:green'>");
             client.println("<font style='font-family:Liberation Serif'>");
             client.println("<center>");
             client.println("<H1 style='font-size:400%;'>Control remot d'un LED connectat a ESP32</H1>");
             client.println("<br />");
             client.println("<br />");

            // the content of the HTTP response follows the header:
            client.print("<br><span style=font-size:4em>Prem <a href=\"/H\">aci</a> per engegar el led 19.<br></span>");
            client.print("<br><span style=font-size:4em>Prem <a href=\"/L\">aci</a> per aturar el led 19.<br></span>");

             client.println("</BODY>");
             client.println("</HTML>");

            // The HTTP response ends with another blank line:
            client.println();
            // break out of the while loop:
            break;
          } else {    // if you got a newline, then clear currentLine:
            currentLine = "";
          }
        } else if (c != '\r') {  // if you got anything else but a carriage return character,
          currentLine += c;      // add it to the end of the currentLine
        }

        // Check to see if the client request was "GET /H" or "GET /L":
        if (currentLine.endsWith("GET /H")) {
          digitalWrite(19, HIGH);               // GET /H turns the LED on
        }
        if (currentLine.endsWith("GET /L")) {
          digitalWrite(19, LOW);                // GET /L turns the LED off
        }
      }
    }
    // close the connection:
    client.stop();
    Serial.println("Client Disconnected.");
  }
}// final programa
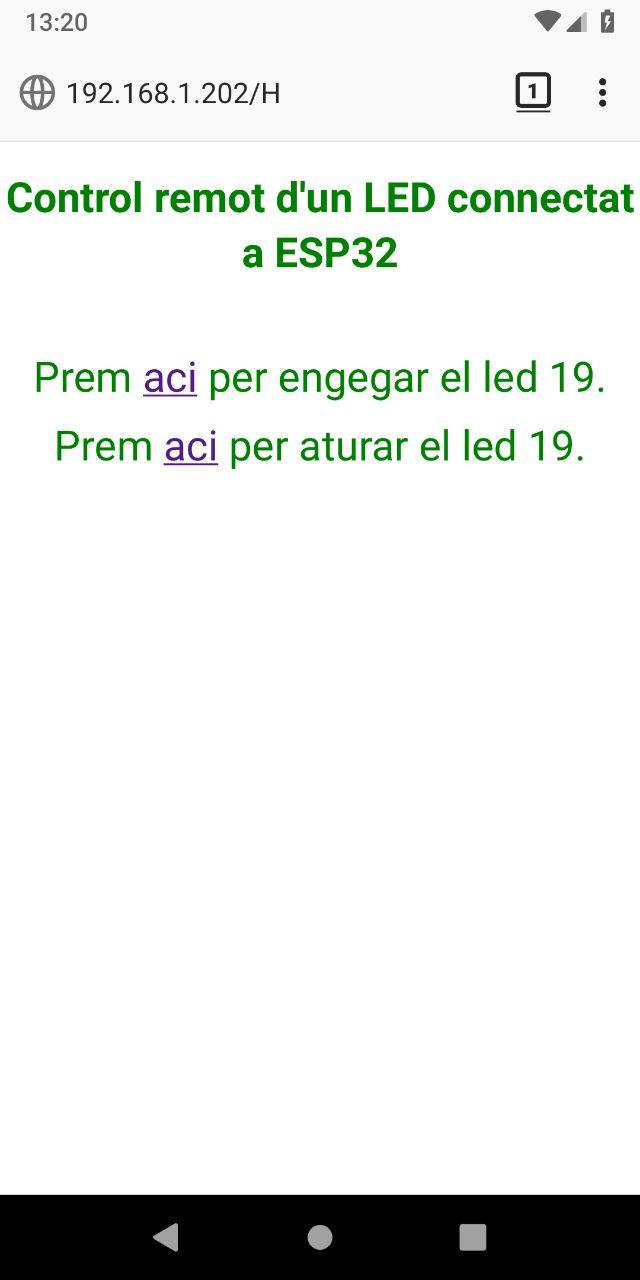
La pantalla del telèfon et mostrarà:

Pots provar altres dispositius i controlar-los via web amb el teu telèfon.
Llicenciat sota la Llicència Creative Commons Reconeixement CompartirIgual 4.0